Showing posts with label Furniture Makeover. Show all posts

Tuesday, October 2, 2018

Antique Chair Rescue with Chalk Paint

For years my antique farmhouse table has been surrounded by mismatched old white chairs. All were in some shade of chippy-white. But as my chairs slowly started to die off (ahem: BREAK) I started to search for a matching set to take their place. 

My mom stumbled upon an antique set of 4 chairs at the local Salvation Army for $8 a piece. 
She did some babysitting while I went to snatch them up... love me some thrift store furniture. 

But when I got them home I discovered that they had previously been owned by a smoker/cat lady! P.U. 
It was okay though, because like most of my furniture, I had plans to chalk paint them. And, with the help of my momma, this was my first reupholstering project. 


I used Annie Sloan chalk paint with a first layer of Lem Lem and a second coat in Duck Egg Blue. Then sealed it off with clear wax after distressing.
 I scrubbed them down first, and that really helped get rid of the smell before I even started painting.


Then, we reupholstered the seats in a French toile fabric I had found at Hobby Lobby. 
Upholstering is pretty easy (for something as simple as these chairs). 
And when you have a good mom/teacher.


I'm sure you're all curious about the "Before" so here is a low quality cell phone picture to help you get an idea. Dark, shiny wood with several layers of upholstery. Very scratched up.
Not pretty, but lots of potential to be.
I really loved the front feet.


These were my anniversary flowers from my husband that he bought from a local flower farm. 
*Heart Eyes*
He's a keeper.
Fresh flowers always go well with dining tables and chairs. ;)


Two of the seats had to be replaced, because they were cracked - when pulling them apart we found STRAW STUFFING! That's how you know they are really old. The real deal.


My mom found a tag underneath the chairs, and they date back to the late 1800's! 

Made by: Phoenix Chair Co. from Sheboygan, WI a.k.a. The Furniture Capital of the World

The tags are hard to read, but one of the clearer ones said they are genuine walnut... maybe someday if I get sick of the color, they will get stripped back down and re stained or waxed. 


My mother-in-law also pointed out that you can tell a chair is old when the back piece is all one with the back legs. I had never noticed that before, but now I'll be on the look out for that! 
They are definitely a very quality made chair. They've been around for so long and are still extremely sturdy. They hardly creek or squeak. 

Yet another reason to not be scared of old thrift store furniture! 
You just have to know what to hunt for.


Here you can see a bit of how the distressing turned out. 

Painting Tip: to save money and time I only painted the Lem Lem (green) in the areas I knew I would be distressing and wanting it to show through.


I am super happy with the fabric I found, and have noticed it in several other blogger/instagramers homes that I follow and love. And I've spotted it a couple times on Pinterest too. I didn't know it was so popular, but I can see why. I love the soft greens and deep jewel tone blues. 


The fabric colors certainly aren't an exact match with the paint colors, and that's okay with me. 
I've been trying to get away from being so matchy-matchy with decorating, because that's no fun. And really, that's not what the true professionals do anyways. 
The colors more just complement each other. They all work in my serene color scheme, and that's good enough for me. No need to overdue the matching.


They are also the perfect chairs for the small toddler boy to climb...
He can step right up on the bottom rung and be up to get into whatever is on top of the table in 2.7 seconds flat. 

Send help.


I'm so glad I was the one to take these chairs home for my table. After paint and new upholstery they are basically good as new... heck, they are better than new, because you can't find this kind of quality nowadays. I figure if they can make it from the late 1800's til now, then they can survive in my house with my two destructive boys. ;) 

Someone else may not have appreciated (or even discovered) the fact that they were so old and special and could have just brought them back or thrown them out once they got a whiff! 


The smokey cat smell is gone, and they are here to stay!


Thanks for stopping by the blog.
I hope you all have a blessed week.

~Olivia


Sharing at: Feathered Nest Friday


Sunday, April 10, 2016

French Linen Console Table Makeover

I shocked myself on this one.
 I didn't distress it.

I repeat - I DID NOT distress this table! 
No chips, no scratches. 
Just a smooth, waxed finish.


I had been wanting to paint this previously scratched, orange-y, blah console table a creamy gray. 


And I knew just the one I wanted. 
Annie Sloan's "French Linen"


However, I had to wait until my mom and I could take a trip to our nearest stockist.
I was trying to be so patient. We had been talking about going for quite some time.
"Some weekend this winter" we would go - we kept saying.
Then one weekend, very last minute, mom said we were going! Yay! Yay! Yay!!


I brought my French Linen and Old White back home and all the sudden I realized I had so many projects I could do! I had been putting them off until I got my beloved chalk paint.
The console table was the first - it sits right in the entry where everyone can see it, so of course that makes sense. I ended up going with these knobs from hob lob. Not what I had originally planned on, but the ones I had originally planned on seemed a little too big I think. You'll see them shortly.


Right now there is kind of a hodge-podge vignette on top of it. 
It needs some help, I know. I kind of just threw on some random stuff that was still laying around and needed a spot to go.
 But I am currently redoing things around here for spring, so it will get redone shortly.


 These were the first knobs I had chose after going through every single one on the hobby lobby website. There are hundreds. I bought the two sets though, because when I saw these in person they just didn't speak to me as much. I was thinking about using them on closet doors in one of the bedrooms since they are more that size. 


Opinions welcome. 
They are an easy switch - I suppose I can go back and forth between the two until I make up my mind for sure. 


This table looks so much better than it did before - I wish I had better "before" photos. It was really scratched on top. I got it as a $10 garage sale score. The inside of the drawer had a Thomasville stamp, so it must have been much more than that at one point in it's life.


Here is kind of a "before" picture, but I tend to forget to take them until after I've already started working on them.
 Knobs off and getting scrubbed. 


This picture doesn't even show how orange-y the wood looked. In some lighting it was pretty intense. Nothing feels more dated to me like orange-y stained wood.


It is much happier in it's new French Linen outfit! 

One more step complete in getting my home decor to actually look more my style.


If you have an opinion on which knobs look better, please leave it in the comments.
They are pretty similar, and I do like them both, so help me decide!
So far people have told me the smaller look better...
But those weren't my decorating, blogging friends! ;)


Have an awesome week!

Blessings,
Olivia


Sunday, June 7, 2015

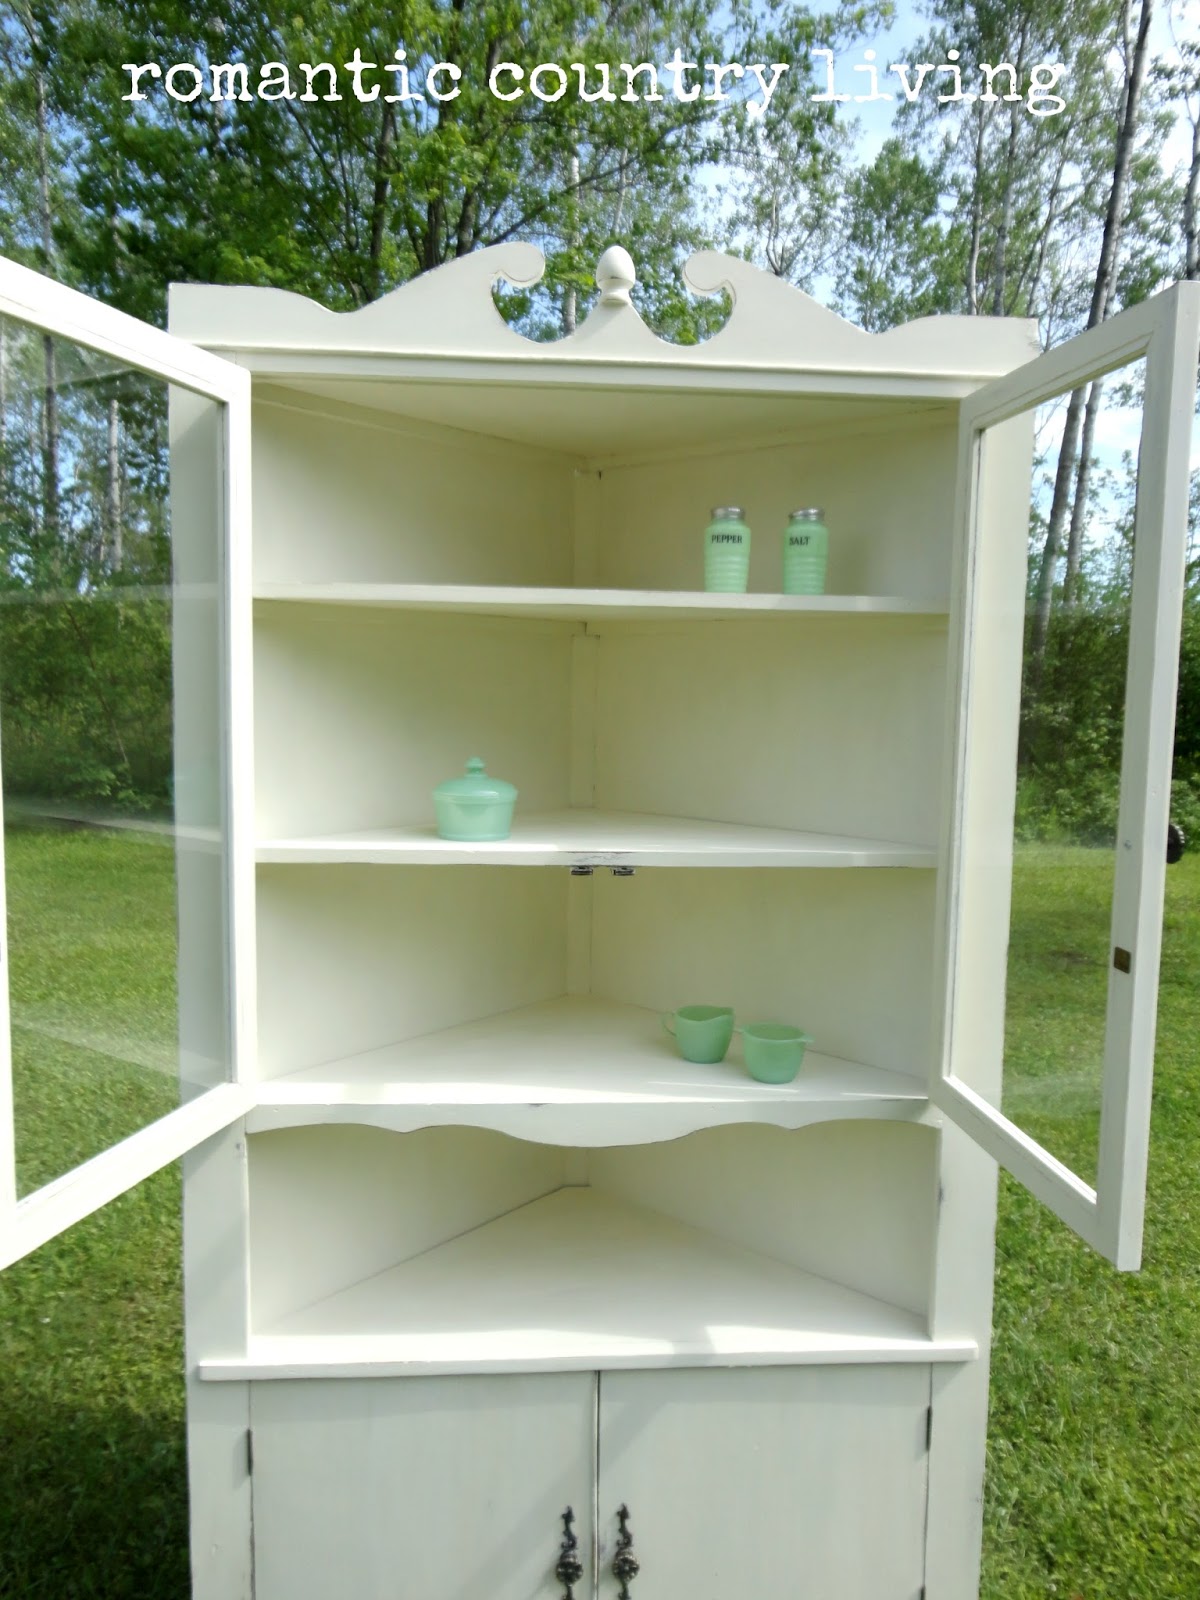
Annie Sloan Chalk Paint - Corner Hutch Makeover

It's finally finished!
This corner hutch was custom made for my great Aunt Bert. She raised my mom, so she was kind of like a grandma in a way...which makes this piece even more special. 

I, of course, had to make it a little more "me".

To do that I painted it with Annie Sloan's Old White chalk paint with a clear wax finish.
I loved the original hardware, which was a bonus!


My loving mom had gotten me the chalk paint for Christmas. She bought it from a stockist in Minocqua, WI, and they kindly shipped it to her!
Check out the stockist's site here:
www.theviolettrunk.com


Before:


I felt like the wood was a little too dark and orangey
and that my dishes would look pretty against an off white.


All ready to paint...Shiloh too!
(notice there were no leaves on the trees when I started this!)


And, the after:


I sawed off the legs because I felt like they didn't really fit the piece and because it was scary wobbly. I am currently on the search for a shorter "spun" leg that will match the top piece.
It needs more of a round style for the feet...if that makes sense.


I painted the inside bottom a custom gray/lavender color, simply to conserve chalk paint ;)
But it is kind of fun to have something a little different when you open the doors.


I am very excited to have a place to display all my pretties!
Now, if only I could have a house to display the hutch. :)
Then I could take my other "pretties" out of storage!

We are sooo close (yet still far away) to having our own first place.
We have had several offers/counter offers in on a fixer upper house that is in such a great location.
However, it is a short sale (ain't nothin' short about a short sale!!) and we are having a tough time hearing back from the bank. Tomorrow is another expiration date for our latest counter offer, so please pray it goes through!! If it does I will have so much to blog about!

Other than that, life is going well back in the country. :)


Thanks for stopping by!


Blessings,
Olivia


Sharing at: Sundays at HomeSilver Penny SundaysTweak it TuesdayParty in your PJsTreasure Hunt ThursdayFeathered Nest FridayFridays Unfolded, and Furniture Feature Fridays


Monday, August 11, 2014

Adorable Outdoor Table Makeover


Yes, another outdoor table makeover! Why? Because my parents love me! 
This cute little outdoor table and chairs was my first anniversary present from them!


Remember not that long ago when I shared my parent's outdoor patio table makeover?
The glass top had shattered, and they made it look all cute like with a wood top... ;)

You can read more about it HERE!


Anyways, one day my mom was at the dump dropping off the garbage and she saw the base of the table and chairs just sitting there. Yes, at the dump!! Looking all adorable and FREE. 

With her recent project in mind, she asked if she could have them. 
Of course she could have them! They were at the dump because they didn't have seats or a top!
(Ohhh silly, wasteful people....)


Just let my mother's creative mind get going (and my father's handy carpenter skills!!), and you've got your self a whole new table...and probably a much cuter one that how it looked originally.


It came with this lovely, natural patina. I love the chippy goodness! 
Maybe that was another reason it was at the dump, but my eyes are just like
CHIPPY = BEAUTIFUL! 


And then, there is this amazing color on top! The pictures don't even show how beautiful it is.
It's a combination of a few different colors I guess, so sorry, I can't tell you the exact name or anything.
It's like a blue/gray/emerald green/beautiful. 


Now I'm just missing the house and cute patio to put it on. ;)


Thanks mom and dad!!! Love yous!


Blessings,
Olivia


Sharing at:

Wednesday, June 25, 2014

Outdoor Table Makeover


I'm sharing one of my creative mother's most recent projects today.

My parents had an outdoor patio table with a glass top, but the top shattered in a storm because the umbrella was left in it. Instead of throwing away the metal base, my mom came up with the idea to cover the top with wood boards (because my dad has a lot of that kind of stuff laying around). :)

So dad cut and attached the wood to the base. 


Then, instead of staining the wood, my mom got some mini paint samples in light blues, greens, and grays and did a sort of "white wash" technique by watering them down.


After that she sealed it to help protect it from the rain and glorious Wisconsin winter weather. 


I think it turned out pretty darn cute, don't you!? Way to go mom!


Before I went to take the pictures of the table it had rained, so I was bringing a towel outside to dry it off.

My mom comes out with me and lifts up one end of the table to let all the water run off before we use the towel on it. Then she looks at me with a little smirk...

"Would you have thought to do that on your own?"
I was like, "uhhhh...no?"
Mom goes, "Huh? No?? Well stick with me kid - you'll be a star."

Hahahaha! She's just so lovable!


Thanks for stopping by!

Blessings,
Olivia


Sharing at:

Friday, May 16, 2014

Antique Farmhouse Table Makeover


I'm sharing another furniture makeover that I did last summer. I refinished this antique farmhouse table right after I finished the Chest Makeover. This makeover I was a little more scared to do because I sooo didn't want to mess it up.


My mom got me this table as a bridal shower present. She found it at the Salvation Army in Hayward for $60! It was in a bit rougher condition, but I gave it some love. We used it as the "Jelly Table" for my wedding (homemade jelly was the wedding favor). I will have to share more about that later...


I had a tough time deciding how I wanted to refinish it. I wasn't sure if I should paint it all white, stain it all dark, or do white legs and a wood top. Do you think I made a good decision?? I suppose I can always change it if I get sick of it...


I realized that I actually thought it had "pretty wood" and didn't want to cover it all with white, however, I still needed some of my beloved white paint.


As you can see it was pretty beat up when I got it...it even had mildew on the top of the table. It came with fold out panels on each side but those were removed to better suit our efficient living situation.

**PLEASE NOTE** the small black dot in the background of these "before" pictures is a rooster! Which is proof that I am, in fact, a country girl despite my current living conditions.


It's actually stamped antique underneath, which I thought was pretty sweet! 


This is underneath the table also. I had never heard of the name, but when I did a quick Google search I realized that my mom got a pretty awesome deal! Even for being a little beat up...
If anyone knows more about "Cushman Colonial Creations" I would be interested in hearing!


Check out her pretty curves!


And her lovely feet!


I sanded the top for so long and there are still little dots of mildew or mold underneath that stain. : (
They are not very noticeable now though. P.S. this picture makes the top look more "orange" than it really is.


Now if I could just find an actual farmhouse to go with my farmhouse table that would be great!

Thanks for stopping by!

Blessings,
Olivia


Sharing at:
Treasure Hunt Thursday
Show and Tell Friday
Feathered Nest Friday
Fridays Unfolded
Furniture Feature Friday
Sundays at Home
Tweak it Tuesday